With the correct tools, getting consistent solid grid layout in a WordPress site is a seamless process. With the help of this tutorial, you’ll be able to setup a lightweight and easily modifiable grid system.
Grid Width Determination
This is the first step and here you will identify the required grid width. It’s actually a breeze to identify the grid width with the Inspect Element feature of Google Chrome. You just need to right click on an object and you will see the width highlighted. If you are using Mozilla Firefox, the best alternative is the plug-in called Greasemonkey.
Designing the Grid
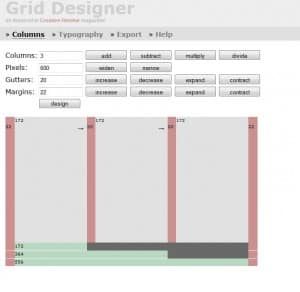
If you are not very familiar with web designing, you can easily use any of the available grid generator tools. I can suggest you one tool myself. It is “Grid Generator” By Mindplay (Official website: www.grid.mindplay.dk); I will actually use this tool for this tutorial as well.
Suppose, we want a 3 column grid and we need to fit it within the width we measured in the previous step (for this example, let’s say the width is 600 pixels). So, adjust the same in the Columns tab just like in the screenshot below:
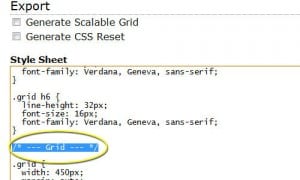
The typography tab may seem a bit overwhelming to you and you don’t need to modify anything here. So, we will straight go to Export Tab. Under the Style Sheet, you will find some code and from there, copy everything that is below the commented out Grid (Below /* --- Grid --- */). If you are not getting it properly, again the screenshot below should help you. You have to copy everything under the highlighted text:
Now, the copied test is to be added in your WordPress site’s stylesheet (After logging into your site dashboard, find it here: Appearance->Editor->Stylesheet).
Implementing Grid
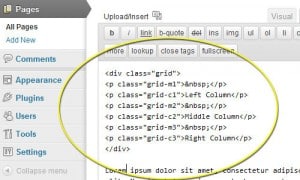
To display the grid in a post or a page, go to the HTML tab and paste this code in the box (remember two things, the class names such as grid-m1 or grid-c1 can differ, so take a close look on the code you paste into stylesheet, secondly, you should replace Left Column, Middle Column etc. with the exact names you want to be displayed in the grid):
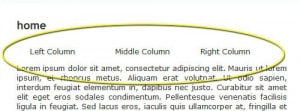
Now save the page and it should look something like below:
Wasn’t it fun designing this grid layout for your WordPress site? You can obviously introduce changes in the code to make way for new columns or even add rows. Do your bit of tweaking and if you face any problem, please get back to me through the comments section. I’ll love to help you out.


Leave a Reply